


Friendship bracelets and summer camp go together like… well, summer camp and friendship bracelets!
Saying goodbye is always bittersweet. Colorful handmade bracelets and anklets keep the campfire vibes alive through the winter months — the more sun-faded, the better.
So far as supplies go you only need three things to get started:
- colorful embroidery floss
- beads (optional: for flair)
- imagination
There are dozens of different styles when it comes to friendship bracelets. Here are a few of the tried-and-true classics that every summer camper should learn!
The Classic Braid
The classic braid is the go-to standard of friendship bracelets. If you can braid hair, you already basically know how to make one. If you don’t… well, read on!
Start by cutting three pieces of embroidery floss. How long? Well, measure around your wrist, and add an inch or two for beginning and closing knots. Consider using more than one color to give the bracelet some personality!
Tie the three pieces together at one end and begin braiding the floss. You can pin the end down with a clothespin if that helps keep you steady. As for how to braid, just follow the steps in the image below and repeat until you reach the end of the floss:
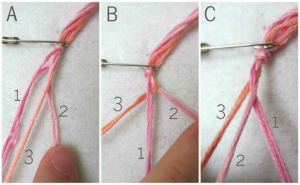
Image source: http://laurenhartmann.com/
Once you reach the bottom, just tie the loose ends with any knot that strikes your fancy.
Now the only task left is finding a friend and helping each other tie them around your wrists! See you next year — pinkie promise.
The Fishtail
The Fishtail is similar to the Classic Braid, but with a few twists that make it a little trickier to pull off. The final result is a little chunkier than the Classic Braid, adding some variety to your styles if you happen to be wearing more than a few. (If you’re a lifelong camper, we’re sure you are.)
But don’t worry; if you can tie a fishtail braid in your hair, tying a Fishtail bracelet should be no problem!
To begin, select about a dozen different colors of embroidery floss and cut them to length, just as with the Braid above. Tie them all together at one end, and braid following his pattern until you get to the end:
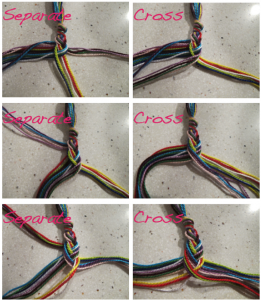
Tie the end and slip in a few beads if you’re feeling inspired — case closed!
Knotted Bracelet
If you can master the Classic Braid and Fishtail, get ready for your final challenge: the Knotted Bracelet! It’s a little trickier than the others, so be sure to pay close attention; especially for the beginning and end, when you’re measuring out the “clasp” part of the bracelet.
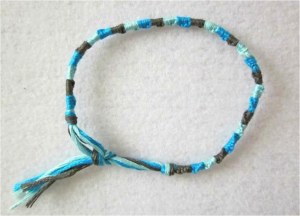
Detailed instructions are available over at The Red Kitchen.
Friendship never ends
The only trouble with friendship bracelets is finding enough wrist and ankle space to wear them all! Just be sure to save a little room for next summer… and the one after that.
Adding a little personalized spark to all three bracelet styles is easy: just mix in beads, or maybe even pieces of camp life like acorn caps and seeds.
We’re excited to see what you can dream up.
Tags: America's finest summer camps, camp activities, Camp Starlight, life at summer camp, sleepaway camp, summer camp, summer camp activities, summer camp programs